Tampilkan postingan dengan label boredom busters. Tampilkan semua postingan

Throw a summer dance party!

Diposting oleh fawaid on Senin, 20 Juni 2011

This was the funnest way to kick off summer with the neighborhood! 

(WARNING! LOTS OF PHOTOS BELOW)

We had the idea and 6 days later we were dancing it up in the backyard! It's easy to put together and "run the event" because the kids make their own fun! And it's ALL kids - no parents (well except for me and my hubby) so the kids really enjoyed their freedom - aka - raiding the treat table without restrictions! ha ha ha!!

Invitations can set the tone for the party or event and give a peek into the theme. We just wanted it to be colorful and fun! I whipped up these invites and sent them to the 1 hour photo. Yup! We handed out "photos" for our invites. Easy, quick and not expensive at all!

 (did you catch that I inserted my kids faces into Gabriella's and Troy's? fun! fun!)

Keeping it colorful and fun my daughter thought tissue paper pom poms in a rainbow of colors would be really fun hanging over the patio. We added crepe paper and some balloon in all colors too! Easy, inexpensive and quick! 


We even hung a "disco ball" over the dance floor. 


We welcomed the dance party guests through the side gate!


I covered an outdoor meter and a pipe by draping 2 metallic door covers side by side as a "backdrop" for the treats table!


In keeping with the rainbow theme we bought treats that were colorful!


This was a very popular spot all evening!!!


Let's get to the dancing!!!! The DJ table had a small stereo with all the CD's laid out. That way the kids could make requests of what they wanted to hear next. Among just the regular dance songs we did a JUST BOYS dance, JUST GIRLS dance and A BOY/GIRL dance.


Of course we had some of the oldies but goodies in there too like YMCA, Ghostbusters, the Chicken Dance and yes the Macarena - ha ha ha!


We had some air microphones, air guitars and even a little break dancing too!


This was a great way to have fun with little expense and it made a big impact! It's definitely a new Summer Tradition at our house!


Read More

Summer ideas - recap!

Diposting oleh fawaid on Selasa, 31 Mei 2011

Read More

DIY stilts- Someday Crafts

Diposting oleh fawaid on Senin, 30 Mei 2011


Hi! I'm Michelle from Someday Crafts. As a working mom of 2 young children, I highlight great ideas I see around blogland that I want to do when I get the time.....SOMEDAY! I hope you come over and see my blog! You will find some projects that you want to do someday also.
Today, I am showing how to make some
EASY, INEXPENSIVE and QUICK food can stilts!


After I get home from work, the kids and I play for hours. They are so much fun! These stilts (or rompers, as they were called when I was younger) are one of their favorite activities. It builds great coordination and forces the kids to work on their balance.

Materials:
-Two emptied cans of food (28oz or larger)
-Two pieces of rope or heavy duty string, each at least 1 yard long
-A sharp object that can puncture metal, i.e. screwdriver, knife
-Spray paint (optional)

1. Empty two large cans of foods. These are 29oz. fruits. If you use smaller cans, they will be less sturdy. Wash the cans out!

2. Peel the labels from the cans and gather your spray paint. I got this Krylon outdoor spray paint at the dollar store! SCORE!!! (Those are my cute kiddos!!!)


3. If you are brave, let your kids spray paint the outside of the cans. Let the paint dry. (My kids like to help with everything I do. That's why I don't get much done!!!)


4. Using a sharp object, punch two holes through the can on opposites sides. I used some type of knife. The holes need to be near the top of the can where a lid still exists. I do NOT recommend letting your kids do this part!


5. The holes need to be large enough to fit your handle through. When I inserted the knife, I wiggles it back a forth a bit to make the hole wide enough.

6. Cut your handle material. I used something called mule rope (or at least that is what my husband told me it is called.) It is like a strong flat rope. I suggest a rope or heavy duty string. I would also suggest at least a yard or more of material. It depends on the height of the person for whom you are making it. The handle should come about half way between the knee and hips or whatever is comfortable. Insert your handle material through the holes from the outside to the inside.


7. When the handle material is inside the can, tie the ends in double knots. You can burn the ends of the rope if you want. You are finished!

Here is one pair of spray painted and one unspray painted cans. If you don't paint your cans, there is a chance the cans can rust. I have tied knots in the handles of one pair to make them easier for my younger/shorter son to use. That is an easy way to adapt the handles for smaller kids.


Walk. Walk. Walk. I did want to mention that the food cans can/will bend if they are stepped on sideways. I just bend them back into place the best I can and let the kids continue clanking around.

These were a hit at my kids' birthday party last year! (Kids under the age of 3 may have a hard time balancing on these. Use your judgement as to when kids are old enough to play with these.) The neighbors love to play with these toys.


Thanks for letting me share one of my kids' favorite activities. I hope to see you over at Someday Crafts.
Read More

Summer in a Jar - Fingerprints on the Fridge

Diposting oleh fawaid on Jumat, 27 Mei 2011

Hello friends! I'm so glad Megan invited me on over to hang out for the day!


 If you don't know me, my name is Rachelle and I write the lil' o blog Fingerprints on the Fridge.

These are my two silly girls who are really looking forward to summer fun. 


I wanted to share an idea that my family thought up to add a little spice to our life during the summer. Sure a list is fun but Summer in a Jar adds a little surprise to each day! Love it.

I started by getting a cookie jar, you can get them basically anywhere or even use a vase. I liked the size and style of the jar though, I got it at Wal-Mart for 6 bucks. Score!

Then comes the list, the list o' fun if you will. I asked for my kids ideas and some of my own and made a giant, colorful, some simple and some over the top rainbow list of things that we could do every day to make the whole summer special. Some are free and some cost a bit of money but you could make it however you wanted to make it work for your family. That's the beauty of the Summer of fun in a JAR.


Next I cut out all my strips of paper one by one, and folded them but not too tiny, I still want to see all the colors. :)

Then scramble them up and you can pick one out each morning and have a surprise added to your day on what to do! How freakin' fun is that? Some of my favorites are..

Coloring the whole sidewalk with chalk and making an outside gallery walk.
Riding our bikes to the Root Beer stand.
Going to the "big" zoo (Chicago's is closest to us. Love it there)
Using the baby pool and a hula hoop to make giant bubbles.
Coloring our hair, remember making kool-aid highlights when you were little? So fun.

Those are just a few, but the possibilities are ENDLESS.  

Make a lemonade stand, go to the beach, get out sprinklers, camp out side, camp in the living room, catch fire flies, make s'mores, spend the night at a hotel in town, go minature golfing, go to a water park, Fun stuff

Summer comes but once a year, let's make it F. U. N! I know for one my kids are going to be pumped to wake up every morning and pick out of the jar. And, if every day doesn't work for you how about just on Fridays? Or Weekends? Make it work for your family and add a little spice to your life
Summer.

Feel free to stop by and say Hi!

Photobucket


Thanks again to Megan for having me, so much fun!
Read More

Put me in the Zoo - Fireflies and Jellybeans

Diposting oleh fawaid on Kamis, 26 Mei 2011

Hello Brassy Apple! I cannot even begin to tell you how excited I am to be here today with all of you lovelies! I adore Megan and all her crafty-ness! To say that is it a complete honor is not even touching the surface!

Let me introduce myself!


I am Fawnda and you can find me at Fireflies and Jellybeans!  I am a thirty-something mom of two{ 3 year old son and 1 year old daughter}!  My Husband is my best friend and biggest supporter {I am every lucky}!

We have all sorts of fun over at Fireflies and Jellybeans! I share crafty tutorials with you, we have the Iron Crafter Competition and a fun Show Off Your Stuff linky party on Thursdays.

I am also so excited to be part of the Save Our Summer series! I need as much help as I can get with my two Little ones... I am also happy to share one idea with all of you too!

Put Me in the Zoo Activity day!

Lets face it... most days I feel like I live at a zoo with all the wild craziness that is my life! I decided to embrace it and make a whole day of fun activities for us all! 

And as any good theme day we need t-shirts!


Here is a quick run down of  how I made the shirts... I used my Silhouette SD (who I loving call, Skyla) to help make these... however you do not need one to make your own. 


Sealed with a Kiss Shirt:

1. Cut out a seal applique, and sew it on

2. Add your "Sealed with a Kiss" lettering (I used Iron on vinyl from Silhouette but you could freezer paper stencil the words on too! )

3. Add your "XOXO" rhinestones (also from Silhouette)


1. Cut out felt shapes-

1 circle for face

several bigger strips (about 3/4 inch wide)

several smaller strips (about 1/8 inch wide) some long some short.

2. Pin your wider strips to your circle and sew in place.

3. Pin your smaller strips in place (random with the short and long) and sew.

4. Hand sew the face.  I used 2 buttons for eyes and a triangle piece of fleece for the nose.

5. Pin in place on your t-shirt.  I sewed around the face and then also out side the circle a couple inches to keep the mane attached to the shirt.

6. Add your lettering (I used iron one vinyl from Silhouette but you could a freezer paper stencil)

Put Me in the Zoo Activities:

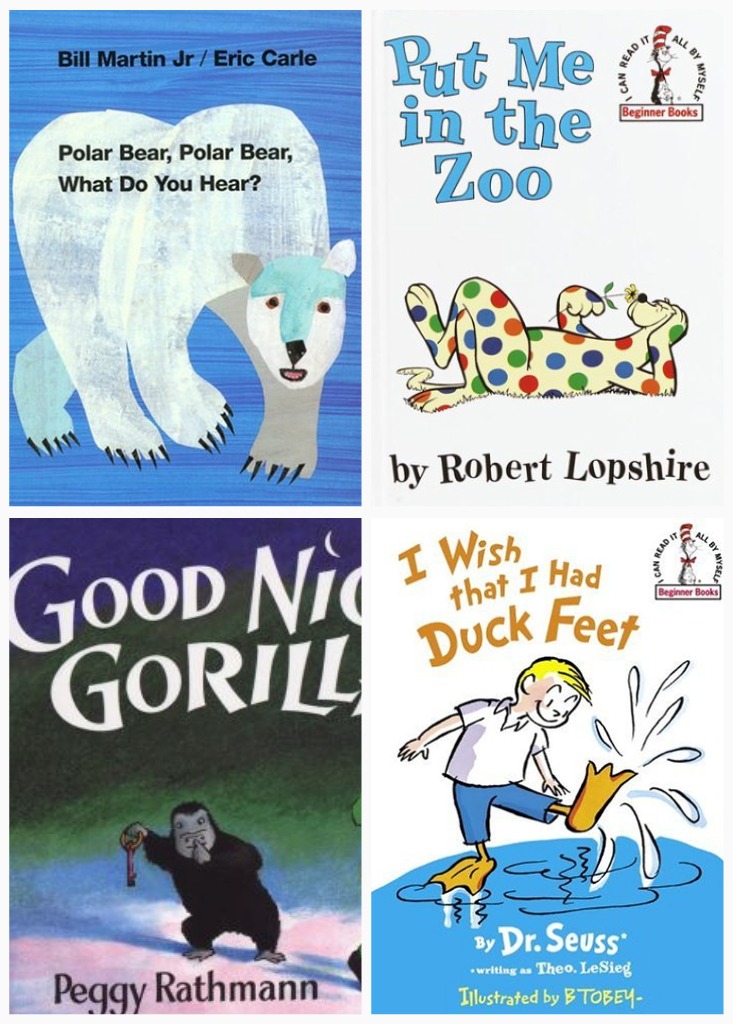
Here are some fun books to read that we love and have to do with zoos and animals!


Polar Bear, Polar Bear What do you Hear?

Put me in the zoo

Goodnight Gorilla

I wish that I had Duck Feet

Animal Follow the Leader:

The leader picks and animal to mimic and everyone follows along.

Take several turns being the leader.

What do you hear?

This is a great activity to go along with Polar Bear, Polar Bear, What do you hear?

You start out saying "Mommy, Mommy what do you hear?  I hear a {pick your animal here) in my ear"  then all make the animal noses... then move on to your kids "Johnny, Johnny- what do you hear?"  then have them pick an animal and say the rest of the rhyme.  You can do several rounds until you make LOTS and LOTS of animal noses!

Make your Own Zoo:

We had a rainy day so instead of going to a zoo, we made our own!

I was quite surprised at how many stuffed animals we had... we had a FULL Zoo!

I had the kids help me set it all up.  It was a great sorting activity!  Once I had some groups established,  I would pull out an animal and ask "Where do you think this should go?"  The kids LOVED making the zoo... almost more then playing with it!  If you have older kids have them make signs for the zoo. 

Here is a tour of our zoo:


Tigers Exhibit

Elephant Habitat  Our Elephant has a baby!

Giraffe and Zebra exhibit

Wolf/Dog Exhibit - we had some rare species of wolf- pink, purple and green... not what you see an just any zoo!


Penguins (with a baby!)

Petting Farm zoo

Aquatic animals

Monkey playground


Our zoo also has a very special exhibit! 

The Monsters exhibit! 


Of course here are the WILDEST animals of ALL! 


I made them pay $$ to enter the zoo... and they had to wait in line for the zoo to open.  We had a friend over what I watch once a week... she added the phone as a prop.  My son HAD to have a wallet to keep his money in!  My youngest is trying to sneak in early!


I also had them bring a camera to take pictures of the animals!

In the second picture my son is looking at the picture he just took and saying "Ohhhhhh, Cuuuuuute!"

Snack/lunch:


Here is our zoo themed lunch.  I used turkey lunch meat for the face, cheese stick for the mane, blueberries for the eys and a strawberry for the nose.  Easy and very kid friendly!


We love Put Me in the Zoo Day!!

Thanks for letting me share today!  We had so much FUN! 

Stop by for more fun ideas!!


Read More