Tampilkan postingan dengan label decoupage. Tampilkan semua postingan

What to do with your kids.....

Diposting oleh fawaid on Minggu, 02 Agustus 2009

I taught a class this week and gave out ideas on fun activities to do your kids. It went over well - at least I think so - and I had a fun time preparing for it and sharing the info in a casual setting. As promised I am going to share all my "notes". Some of them may have been yours too! (thank you, thank you!)

My notes (edited/condensed version)

1. First of all, my day to day fun activities usually are very inexpensive and I grab and use what I have one hand first before going out and spending any money 0n supplies.

2. Use your Resources! The library is full of books with great ideas, plus they have activities all year long too. Keep a craft/supplies box, trade supplies with friends and best of SHARE your ideas! :) (it's always nice to share right?)

3. Don't be so worried about the mess. Yes if you get out paint there is probably going to be a bit of a mess. Let them get a bit dirty without you being uptight or upset about it. Enjoy the creative moment together and clean it up when they are all done - better yet, have them help!

4. Be willing to improvise - use what you have on Hand, go with the flow, be flexible.

All these ideas are just a jumping point for you. Take them and tweak them for your family size, kids ages, likes and dislikes and apply them for all year round!

----------
  • Schedule the fun! Kids love some structure or to know or count on certain things. Sit down as a family and "plan" some fun. EX. - First Friday of every month is family movie night. Then make is special. Whether you go the theater or stay home. Bake a goodie together before hand, have a sleep over in the living room, etc.

Summer Fun!

  • Create a summer journal - when school let out for the summer we created summer journals. Just a fun way for my kids to to stash away the magic of summer and create an informal scrapbook. It's full of their thoughts, handwriting, pictures they drew and pictures we took and simply printed out and glued in.
The first page of their journals also contains a current picture of them, weight, height, current friends, shoe size, favorites, etc. Just a few fun statistics to read when they are older.


  • Create a Summer Fun Calendar/Schedule. Ask them what they want to DO this summer - list it on one side of the paper and title the other side - Things we DID. Keep a running tally of all the fun! They can't say they never did anything fun this summer when it is all listed out! Other ideas - Books we want to READ/Books we READ, Places we want to go/Places we WENT. Also have them help you compile a BOREDOM BUSTERS list they can refer to when they get bored! Hang it up where they can see it (at their level).


  • PICNICS! Who doesn't love to have a Picnic! I shared a 2 sided handout full of different picnic ideas for Summer/Winter/Rainy days. (click HERE to download a copy)
  • Camping outside in the backyard
  • Try a new park each week - don't forget about school playgrounds too.
  • Go on a Nature/Scavenger Hunt - give your kids a small paper sack and have then collect certain colors, textures, etc.
  • 100 days of Summer - Activity ideas from Memorial Day to Labor Day (click here to download a copy)
  • Letterboxing.org - It's like a local treasure hunt that your kids will LOVE

Road Trips

  • Mary Poppins Bag - (refer to my previous tutorial on how to create this) Extra ideas - Print out a map, games, dot to dots, mazes, etc. Convert an old metal cookie sheet into a game/lap board. I sprayed painted one blue, took a paint pen and drew a tic tac toe board on side and then drew some X's and O's on the tops of some small magnets. Create an I SPY BOOK to slip in too!
  • The "mary poppins bag" theme can easily be adjusted for a fun day at home too! Pick and theme and have activities lined throughout the day.

Everyday Activites

  • Spin Art
  • Placemats
  • Paper Plate Masks - We create these all the time! From Jack Sparrow to Power Rangers to Princesses. Cut out the some eye holes for your kids if they are too young to use scissors and let their imagination RUN! Add yarn for hair, use construction paper to add hats, crowns, etc. Then use some elastic thread and a hole punch to make it slip on and off easily!


  • Newsprint Paper - Does your local newspaper get rid of sell the end of the newsprint paper rolls? Ours does for only a couple of dollars on a certain day each month. Snatch up a roll or two! These are great for activities all year long. Cover the table and then color/paint. Trace their bodies and have then fill in their features, draw clothing etc. Hang a long piece outside on your fence in the summer and let them paint, or fill spray bottles with water and a couple drops of paints and spray the paper. Then it can dry while it's hanging and you can let the kids run through the water to clean up!
  • T-shirt Capes - These are a great no sew item to create. Be sure to click on the link for the tutorial.
  • Muffin Tin Monday - Oh your kids will LOVE you for creating such a fun lunch! Ooodles of ideas and answers to all your FAQ's about how to do this!
  • The Crafty Crow - HUGE amount of crafts for all sorts of topics/types and ages
  • Book/Activity - Take a book, read it together and create a fun activity that goes along with it. Take a look at what Nic did with her kids and the book Sweet Dream Pie - GREAT family activity!!!!
  • Mini Camps - Gather your friends/neighbors and set up some mini classes/camp for summer or during the school year too! 1 wk they go to so and so's house for a Sewing Class, then the next week go to another house for Painting Project, etc. (remember - use your resources!)
  • Papier Mache - we have had fun creating our own pinata. Create masks, globes, etc.
  • Decopauge - fun for ANY age and so many uses too!
  • STAYCATION - make the most of staying in town! Be sure to visit the link for ideas, instructions and print outs!!! they are fabulous!
I hope you enjoy my notes and that they spark some ideas for you to do with your own family! Enjoy!!! ~ Meg
Read More

Decoupage - crafting with kids - organization...

Diposting oleh fawaid on Kamis, 30 Juli 2009

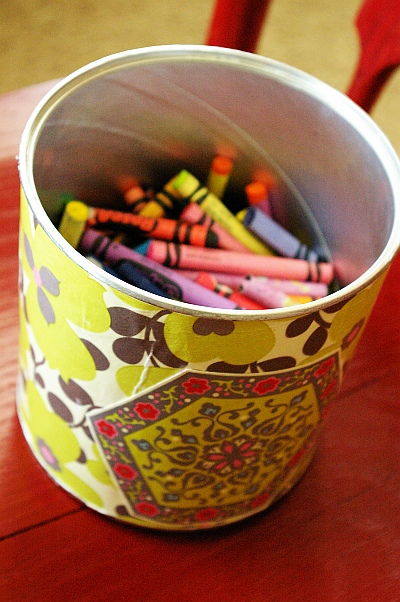
Thursdays are crafting/cooking days with the kids around here during the summer. This time we did an old time favorite - decoupage! Very simple project, nothing fancy but the kids really enjoyed themselves!

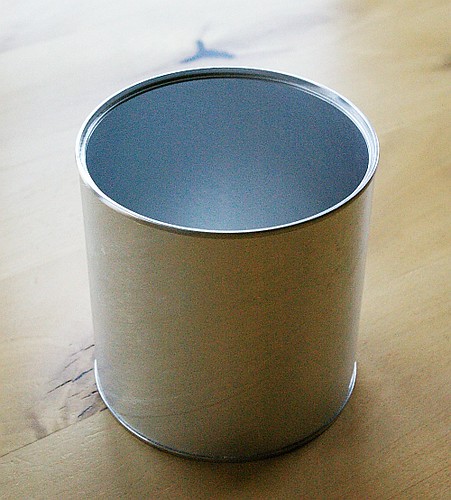
Step1 - I took an empty baby formula can, ripped off the label and cleaned it out. It is our blank canvas just screaming to be transformed! LOL


Step 2. Measure the width of your paper and cut if you want to cover the entire can that way. Or simply cut out pictures from magazines, cut squares of scrapbook paper, tissue paper, etc. The Sky is the limit here!


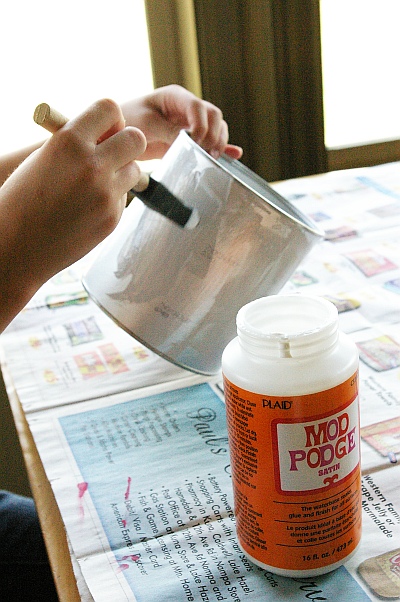
Step 3 - Give your can a good wet base coat of Mod Podge. Or if you going to be putting smaller pieces on only put a base coat on one small area at the time. Apply your paper while the Mod Podge is still wet.


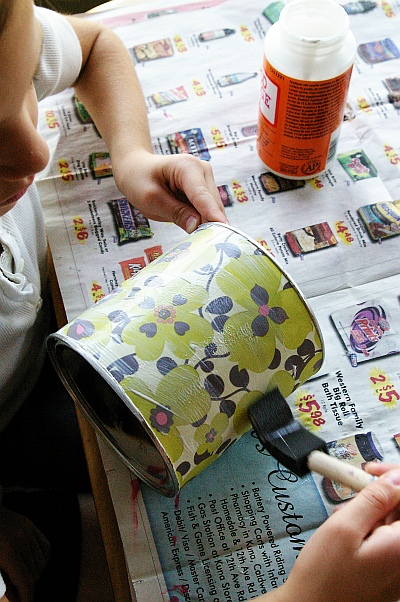
Step 4 - Generously apply Mod Podge over the paper, pressing out any air bubbles that creep up. Cover the entire surface is a good layer of Mod Podge.


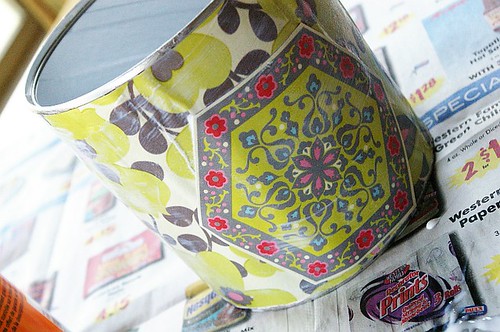
step 5 - Once you are done layering your paper pieces on, let your piece dry.


Step 6 - Once dry, fill it up with fun things! It's a great way to keep your kids "organized" and they get to have fun creating it! Fill it up with Pencils, markers or crayons. Use it for hair barrettes, rubber bands, comb and brush. Or corral all their small treasures in one handy container - you choose! Have fun!!! **If you try your hand at a fun project - share it our Brassy Apple Project flickr group!

Read More

Calling all "mod podgers..."

Diposting oleh fawaid on Rabu, 18 Maret 2009

Hey this contest is for you! If you are familiar at all with my blog then you know I've done a fair amount of "decoupageing" with Mod Podge. Well.................now you could put those good skills to work and love of all this mod podged and win!


Plaid is holding a Spring Craft Contest! They want to see your Spring inspired projects using Mod Podge. So break out a bottle and craft up something fun! Let me know what you create and if you enter!!! Have fun and good luck!
Read More

Clarification.....

Diposting oleh fawaid on Kamis, 05 Maret 2009

There seems to be some confusion between my "old" blog and my blog. And it probably has to do with the fact that I have linked the tutorials that are on my old blog. SO - to help everyone out - hopefully - I will be transferring those tutorials over here. :)

Look for several posts in the next day or so of those tutorials popping up here.

And as always, if you tried out my tutorials please upload and share the pictures of your projects into the Brassy Apple Flickr group!

The link is always accessible in my right blog sidebar to click on over to snatch up some inspiration!

Here's the latest photo uploaded. I just LOVE how her desk turned out!

Read More

Everything old is new again.....{Faux Leather Deco. tutorial}

Diposting oleh fawaid on Senin, 14 Juli 2008

As I mentioned last week I have several projects in the works. One being a large file cabinet I snagged at a yard sale for $5.00!!!!!!!!!!!! I still can't believe it! I knew right away what I would do with it and how I would "transform it". I love when the piece screams at you and tells you right away what it needs. (Yes furniture and fabric to talk to me. Don't they talk to you as well?)

I thought I would document with photos how it went from sad to FAB and share the process, tips and tricks with you.

Faux Leather Decoupage Tutorial
Materials:

Mod podge - or watered down glue medium
sponge brushes
item to be transformed
Paper to layer over your item - I used brown shipping paper
paint - if necesary
Clear coat - optional

Step 1: Wiped all dirt/dust from my cabinet. I also suggest painting in this step as well if necessary. That way you don't have to worry about accidently getting paint on your mod podged area.

I painted the base of my cabinet and drawers because only the top would get decoupaged on.

($5.00 cabinet before)


Step 2: After my black paint had dried then the fun began! I wanted to go with a brown/black theme for my cabinet so I grabbed some brown shipping paper to use to cover the top. The was originally a wood laminate that had begun to chip and fall off. Hence the need to cover and re-do the top of it.

To keep covering the top as simple as possible I lined up the staight edge of the paper with the bottom edge of my laminate top. (pictured below) I tore a piece of brown paper in a random shape keeping in mind the length of the top and tearing it off so it barely over lapped the edges on both ends. (pictured below)


Step 3: Working in sections, I put down a good layer of mod modge on my laminate top where the paper would lay. Then I repositioned the paper on top of the mod podge glue and saturated the paper with a layer of glue to keep it in place. Repeat the length of your paper working under the paper and then on top.


I definately got my hands "dirty". Fingers and hands can be the best tool for smoothing out the paper, applying pressure, and spreading the glue medium around. Make sure you put a good coat of glue on your paper so that is adheres to your base project.


Step 5: Continue to layer your paper pieces on top of each other in any sort of "pattern" you like.

Once I had all my pieces in place I added an extra coat of glue to "seal" the entire top. The easiest way to do that for me was to pour the mod podge from the bottle and use my hands to spread it around. This also allowed me to smooth out any bubbles and create "wrinkles" in the paper which would add more character to my "faux leather" looking top.


Step 6: Let dry. ****The paper will bubble as you get it saturated with the mod podge and as it dries. If you've done a good job smoothing out the bubbles as best you can, just step back and let it dry. The bubbles will look awful but give it a few hours (for a large project like this) and the paper *should* flatten itself out once it's dry. ****

Step 7: OPTIONAL - Add a clear coat over your decoupaged area letting it dry in between coats. I think between my husband and I we put on about 4 good coats on. The top now almost looks like it has glass over it. Very cool and very family friendly. Easy to wipe clean and protected from the rough and tumble of everyday life.

***Adding the clear coat will also bring out and darken any areas on your paper that were not completed saturated and sealed by the mod podge. Please be aware of this. I learned the hard way and ended up with several "spots" dotting the top. Although it turned out less than perfect from what I had hoped it would - sometimes mistakes can work too!***

You can add more paper to cover these spots too. One reason why I wanted to share this technique was to offer my tips/suggestions from the mistakes I made. :)


And you are done!!!! I moved it into our Family room upstairs and have just begun to "accessorize" it.

Pretty good for $5.00 wouldn't you say?

Of course this same technique can be easily used for many other items and with other mediums. I would love to someday decoupage a large item with old maps!

Be sure to upload your photos from this project into the Brassy Apple Projects Flickr group!

Read More

My studio

Diposting oleh fawaid on Rabu, 05 Maret 2008

Thank you for the wonderful response to my "peering through the lens" post. I'm glad you enjoyed it as much as I did. I will be doing more as I find homes to shoot and share! I have been wanting to share photos of my new office/studio for awhile now but I was waiting until it was done. Then I realized that I am never really "done". Spaces in my house change every few months or with the seasons. They might not be BIG changes but sometimes the smallest change can make a big difference.

So here are some photos of my "unfinished" space. If you get the knack to share your space, let me know in the comments! I'd love to swing by and see your photos.

First off is my desk. You can see in my blog header what that looks like. I took an old chair that I have been hanging onto for years and gave it new look and purpose with some red paint.


Then I found a STEAL of a desk on craigslist,


sanded it down - hubby did the hard work (thank you again!) and gave it a fresh, high gloss, coat of black paint. (I did help with the painting part - LOL)

Then the fun part started! I took some fabrics with fun patterns and colors that I just loved, measured the drawer fronts and cut the fabric the same size. I took some Mod Podge and painted it on the drawer front, laid the fabric down on top of it and then put a couple of coats of Mod Podge over the top letting it dry slightly between coats. Once it was dry I then applied several clear coats on top of it so it ended up with a shiny, well protected finish. (great projects for little helpers!)


and VOILA! I have a desk that I absolutely LOVE! It's a large piece of eye candy in the room, it reflects me sooo much and it's functional! I topped off the drawers with some updated sleek silver pulls too.


Fabric shout outs (starting left to right and top to bottom) go to Anna Maria Horner ~ Bohemian, Jennifer Pagenelli ~ Modgirls, Joel Dewberry ~ Manzanita, Heather Bailey ~ Freshcut, Amy Butler ~ Charm, Anna Maria Horner ~ Chocolate Lollipop.

To help keep me organized I took an old metal frame which I had stored away too for just the right moment and lightly painted it with the same red paint as the chair. I wanted it have a worn look and not be completely covered. I had some metal custom cut to fit the inside and now I have a metal board which of course is adorned with my bubble magnets.


and here's a few photos to end this little "tour" around my little space! Thanks for coming along!

If you'd like to see more studio spaces check out these groups on flickr loaded with photos - Sewing Rooms, Creative Spaces, Art Studio, Work Spaces, and many MORE!

Be sure to upload your photos from trying this project into the Brassy Apple Projects Flickr group!
Read More

Peering through the lens

Diposting oleh fawaid on Senin, 03 Maret 2008

I've recently been busy with some projects and haven't picked up my camera in a while and I was really "craving" a good creative photoshoot. I needed to go out and snap pictures of interesting objects and fun angles and I needed color! hummmm......but what to shoot? It's the end of winter and most stuff around here is pretty drab. I contacted my cousin and ask her if I could come over and take some shots of her house. So couldn't stop laughing! She said, " what do you want to take pictures of? The laundry, the piles and dirty dishes? " Ha! Everytime I go over to her house she has re-arranged things, added new stuff, painted something, salvaged an item into something great, etc. Her house has lots of color and interest, yet it all works together in a way that it feels alive and inviting. It has such a personal atmosphere. I love it! I am hoping that maybe I can convey that through the photos and maybe you will see something you like that might inspire you. Enjoy.... and don't forget to pick a favorite song on my playlist and turn it up while you watch the slideshow (it's so much better that way - *wink*)


I wanted to highlight a few fun things she has done that maybe you caught in the slideshow. First, I love how she takes ANY object, old or new and gives it a new purpose or personality.

Color - she uses it and is not afraid of it. Mix it, match it and splash it around.

Second, she surrounds herself with things that she loves. Maybe that is why her eclectic style works? Why not be comfortable and LOVE the environment you are in, right?


I loved the family photo she had on her wall. Just a casual photo of themwalking through the woods and printed out on regular paper. Then instead of just placing it in the frame she crumpled it up and gave it some dimension and character. The frame allows the photo to have "hills" and "dips" and take a shape of it's own.

Did you catch the scrabble pieces? My cousin took a green metal tray, hung it on the wall and uses it as a magnet board to display photos. Here, her 3 boys are showcased each with names underneath spelled out with scrabble letter magnets. Easy DIY project and a great way to repurpose a few items you may already have around your house!


And I HAVE to mention the dining room table! It's been a favorite of mine since she first created it! The top is completely decoupaged with torn world and road map pieces highlighted with black legs and it's square shape (sidenote: I love square tables). The chairs even get new covers whenever my cousin feels the whim to change them. Right now they have been covered with some denim jeans - pockets, funky seam lines and all!

I had to include a photo of her too, isn't she darling!? Her warm complexion and darling pop of color in her hair! Just as cute as her house!


Another great feature is the chalkboard wall that sits under the bar/counter area. So great for families! I love chalkboard paint and have seen so many cute things done with it. And of course the bar stools! Love the tops of those! I have my own "decoupaged" bar stools and everyone comments on them. It's so easy to do and really makes a statement! Think about it.......


I asked cousin for a favorite quote so share with all of you as well. (you know I'm a quote junkie). She has several and gave me three. I picked one I loved. I hope you've enjoyed this little "tour" and have been inspired in some small way.


(sidenote: I would love to do more posts like this, so if you'd like to see more too, let me know!) xo - Meg
Read More

Sweet Deal - 1 day left!

Diposting oleh fawaid on Sabtu, 16 Februari 2008

My website is soon to be underconstruction and out of commission as it get's a makeover - woohooo! So I'm having a sale on my DIY kits to clearance them out! Snatch some up now!

If you are on my mailing list then you heard abou the sale on Thursday - lucky! you got first pick! for those of your not on my mailing list here's your chance! the sale runs through tonight - Feb 16th until Midnight! Just spend $20.00 or more on DIY kits and enter the coupon code - sweetdeal - to get $8.00 off your order! Hurry! there are a few styles already gone but still plenty left to choose from! Grab some for now and some for later! Enjoy!


If you'd like to join my mailing list simply fill in your email address in the "newsletter" box in the sidebar on the right of my blog.
Read More