

And when you can't thrift one to makeover, why not make one yourself! Can you guess what I used?........Hanging flower baskets!!!! You can make one too!
DIY Chandelier
Materials:
4 - 10" wire hanging baskets - (got mine at the $1 store!)
Wire (I used 19 gauge I had on hand)
Needle nose pliers/wire cutters
Hot Glue Gun
Spray Paint
Embellishments - crystals, beaded necklaces (I bought a pack of silver ones at the $1 store), round mirror pieces, colored beads, jump rings, etc - whatever you like!
**Share your finished project in the Brassy Apple Flickr Group!**
download the full tutorial to keep/print HERE
Let's go!
Step1: Place 2 baskets together - rounded side up/flat side down. Connect them in the middle using wire. Wind tightly. Be sure to space the "loops" to the sides as shown in the photos below.


Step 2: Take your 3rd basket and thread the hook and chains up through the middle hole and lay off to one side.
(threading up...)

(laying off to one side....)

Step 3: Place this 3rd basket in the middle of the other 2 that you connected - rounded up side/flat side down.


Connect the 4 points that touch (2 on each side. See photo below) with wire. To wrap these with wire easily, apply a small dot of hot glue and then wind the wire around.

Step 4: Turn the entire piece over.....


and place the 4th basket in the middle -flat side down (see photo below). Attached it with wire at the 4 points that are touching as before.

(a close up of how I connected the pieces together with wire)

Flip it back over. Using the top basket that you threaded the hook and chain through the center, the entire connected "chandelier" should now look like this:

Step 5: PAINT! (optional) Hang, spray paint and let dry. We used "berry pink" ultra cover by Rustoleum.

and came out with this beauty! (squeal! White would have been pretty too! just think of all the fun colors you could do!)

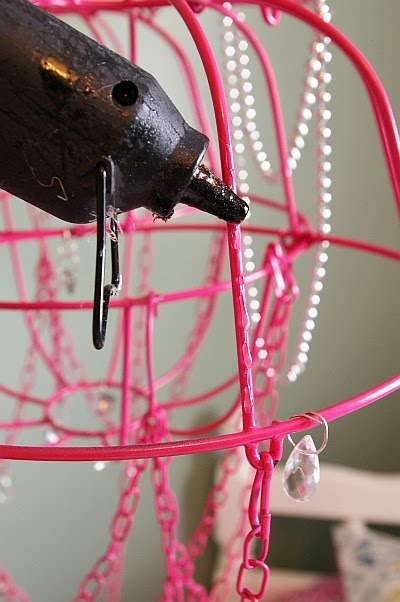
Step 6: Give your chandelier a bit of "shape" (this step is easiest to do if it is hanging). Take the 2 outside hooks and place on the inner rings on each side (see photos below). Secure the hook in place with a small dot of hot glue.

Now the chains that hang have some curves, shape and loop to them.

Step 7: EMBELLISH! now the fun really begins! If you have a supplies stash, you may have some gems you can use. If not, this step can be the "spendy" part. Be sure to look for sales or use coupons at your local craft stores if you can when shopping for crystal embellishments. Don't forget - we picked up a pack of silver "mardi gras" style necklaces at the $1 store. 6 came in a pack too!

There are soooo many hoops, ledges, chains and other surfaces to attach beads and jewels to on your new chandelier - so have fun! Here are a few ideas of places we attached our embellishments....
Detach the center bottom hanging hook and replaced it with a large crystal and jump ring.


I hung teardrop style crystals from the bottoms of each of the loops on the outside chains (pictured above) and also hung smaller round crystals on the chains above the teardrop crystals.
Dress up the center and outside rings....

Draped beaded necklaces on the center front and back. Just a dot of hot glue on each side....


I also glued some beading to the frame on the sides and draped it into the middle....repeated on the opposite side......

Just have fun where and how your embellish, drape and dress up your chandelier!


I want to see how YOU crafted up this project! Share your own style - whether it be classic, boho chic, shabby, holiday themed, cottage, etc - post a photo in the Brassy Apple Flickr Group!
I will be linking up here.....
A soft place to Land, Tip Junkie, Todays Creative Blog, These Creative Juices, Hope Studios, New Nostalgia, We are that Family, Take it from Me, It's so very Cheri, Reinvented, Someday Crafts, Room to Inspire, Sew much Ado, Trendy Treehouse, 733, The Virginia House, Life as Lori, Fireflies and Jellybeans, Shabby Chic Cottage, Somewhat Simple, Favorite things Friday, Fun to Craft, Fingerprints on the Fridge, Poppies at Play, Sweet Charli, Hodgepodge Life, Tatertots and jello, Funky Junk


This project did double duty! It was entered into the Dollar Store Craft challenge and made the top 10!


{ 0 komentar... read them below or add one }
Posting Komentar