Tampilkan postingan dengan label craft tutorial. Tampilkan semua postingan

A "shady" tutorial.....

Diposting oleh fawaid on Rabu, 23 Maret 2011

I am "shady" kind of a girl....in a good way. I love lampshades! I love how they can add color and pattern instantly and are so easily changed out. It's not painting an entire room to get a different feel. Changing a lampshade is 1 of those "no commitment" things. 


No surprise, I change some of my lampshades 3-4 times a year - with the seasons and holidays. I have bought them brand new, on clearance and also second hand. If you have a shade you don't love or have one that needs updating, try decoupaging it!

Materials:
Lamp shade
colored or patterned paper napkins
Mod Podge
brush
scissors

Step 1: Tear the hard edges off the napkin pieces. I like the finished shade to have a more fluid feel than hard, straight, rectangular lines that don't match up.


Step 2: Brush some mod podge on the lamp shade and place 1 of your napkins pieces on top. Brush more Mod Podge over the top. Continue layering and overlapping until the entire shade is covered. 


Use your scissors to trim the edge that wraps around the top and bottom lip of the lampshade


Let dry. Place it on your lamp base and enjoy!

 I will be sharing this idea at the crafty link up parties this week!
Read More

Warm my heart......tutorial

Diposting oleh fawaid on Rabu, 02 Februari 2011

Last year we ran with this idea to hand out for Valentine's day and it was a HUGE hit! Not sure it will ever be topped!


BUT I did come up with a non-sweet and functional gift as an alternative this year. Maybe it will "warm your heart" enough to give it try. I think it's a great alternative for friends, neighbors, teachers, etc.


Warm My Heart
(It's basically THESE but smaller and heart shaped)

Materials:
Fabric
Sewing Machine
Thread
Scissors/Pinking Shears
Rice (not instant)
Ribbon
Straight pins
Type up Poem or create your own!

Step 1: Create a paper template if desired. I cut out a heart that was 4 1/2" high and 5" across at it's widest. Fold the fabric, place your pattern on, pin and cut out 2 at a time using pinking shears (1st photo). OR place the pattern over the fold, pin and cut (2nd photo). Cut 1 heart for the back and 1 for the front.


Place the heart's with right sides facing out (wrong sides together). Cut a 1" piece of ribbon, fold in half and slip between the 2 layers. Pin.
Sew around the edges leaving a 2-4" opening along 1 of the straight sides.
Fill with rice about 1/2 - 3/4 of the way full. (see 2nd photo)

Sew the opening closed. Attach the poem by threading it through the ribbon loop and gift to someone you love!


Read More

Burner covers part 2 - Decoupage it!

Diposting oleh fawaid on Selasa, 28 September 2010

Ready for more? Part 1 was revealed last week! I have loved reading your comments and emails! don't forget to share your finished projects!


This week:

Decoupage it!


supplies:
Burner Covers - I buy the 2pk from the $1.00 store! (yup only .50 each for this project!!!)
Fabric or Scrapbook paper
Mod Podge
Brush


Paint the edges of the Burner Cover first if desired using spray paint. 

Turn the burner cover over and trace around the circle on the wrong side of the fabric or scrapbook paper. 


Cut out and apply Mod Podge onto the top. Let dry. 


Create magnets by using my tutorial HERE

Hang or place on a plate stand! Useful for many rooms of the house. Can be used as a magnet board to hold recipes, notes, photos, etc.


Share what you create in our Flickr group!

----------------
todays post sponsored by:

Photobucket

I will also be blog hopping around these CRAFTY parties! 

Crafts & Sutch

CraftGossip
Read More

Burner covers part 1 - paint it!

Diposting oleh fawaid on Selasa, 21 September 2010

Who's ready to get crafty! I hope you will be inspired to create some of these same projects or spin offs! I LOVE to see what you have created from the ideas shared here in the Brassy Apple Flickr group!


I have several tutorials to share with ideas all centered around using Burner covers! YUP - burner covers!  In this day and age of flat top ranges and gas stoves these babies can be used in new ways! 

Paint it! 

supplies:
Burner Covers - I buy the 2pk fro the $1.00 store! (yup only .50 each for this project!!!)
Spray Paint
Marker or paint pen


Cover the desired number of Burner covers with spray paint and let dry. 


Add the details as necessary with a marker or paint pen or paint brush.


Hang on your wall for a fun FUNCTIONAL art piece! Left just as it they add color and interest but they can also serve as a magnet board to display pictures, school work, photos, etc.....


Jazz up your magnets by following our tutorial HERE

EXTRA IDEAS!!! - Think of how FUN these would be too add a 3D polka dot to a child's wall or how about using it as the center of a flower on the playroom wall ( you could even use the fabric wall art technique to create the petals and stem!) 
I didn't have time to try all ideas - that where you come in! Create some, snap a pic and share it! 

-----------
today's post sponsored by:
Photobucket

I will be linking up with some fabulous CRAFTY parties
Read More

Fabric Wall Art.....create your own!

Diposting oleh fawaid on Minggu, 06 Juni 2010

I love changing up the decor of our home home a couple different times a year. This year we are just renting a house, and because we can't paint the walls this technique is perfect for adding some color, personality and style!

You know I love fabric! Here is another fun way to use it that is also easily changed out whenever you get tired of it and it's NOT permanent! :)

I took a blank space of wall in my daughters bedroom and together we decided that a dress form would be a perfect addition to the space! Oo la la! 

Fabric Wall ART 


Materials needed:


Fabric
Heat n' Bond Lite
Iron
pencil
scissors
*optional - template of your design and/or wrapping paper or brown craft paper


Step 1: Create your pattern/template by printing off a silhouette or sketching out whatever shape you want to use.  *for larger graphics use wrapping paper or craft paper to sketch out your shape and cut out. If your shape is symmetrical, fold the paper in half - draw one side - cut - unfold (Think back to grade school when you folded a paper in half to cut out a heart. Same concept)


I sketched out a large dress form shape and used the "folding" technique so each side of the dress form would be the same.

Step 2:  Place the template on the wall if needed for scale and spacing....


Step 3: Apply the Heat n' Bond lite per manufacturers instructions to the backside of the fabric you have chosen to use. Trace your template and cut out. Repeat with all your template pieces as necessary.


Step 4:  Place on the wall and iron into place using the suggested iron settings from the packaging.

Have fun layering colors and different patterns from the fabric as desired or  the shape, template you chose allows. We embellished the dress form with a necklace that can easily be taken off, changed out for a different color or accessory.


Just peel off the wall when you are done! 


You can find the tutorial for the CHANDELIER here

I will be sharing this project HERE as well! 

It's a Blog Party


If you give this technique a try, share your photos in the Brassy Apple Projects  Flickr Group! I'd love to see what you create! 


Visit thecsiproject.com


Read More

DIY Chandelier........tutorial

Diposting oleh fawaid on Senin, 24 Mei 2010

Glamour, bling, sparkle....those are a few words that come to mind when I look at this chandelier. And that is exactly the look I was going for. I needed to add a bit of glamour and sparkle to a corner of my daughter's bedroom.....

And when you can't thrift one to makeover, why not make one yourself! Can you guess what I used?........Hanging flower baskets!!!! You can make one too!

DIY Chandelier
Materials:
4 - 10" wire hanging baskets - (got mine at the $1 store!)
Wire (I used 19 gauge I had on hand)
Needle nose pliers/wire cutters
Hot Glue Gun
Spray Paint
Embellishments - crystals, beaded necklaces (I bought a pack of silver ones at the $1 store), round mirror pieces, colored beads, jump rings, etc - whatever you like!

**Share your finished project in the Brassy Apple Flickr Group!**
download the full tutorial to keep/print HERE

Let's go!

Step1: Place 2 baskets together - rounded side up/flat side down. Connect them in the middle using wire. Wind tightly. Be sure to space the "loops" to the sides as shown in the photos below.


Step 2:  Take your 3rd basket and thread the hook and chains up through the middle hole and lay off to one side.

(threading up...)
(laying off to one side....)

Step 3: Place this 3rd basket in the middle of the other 2 that you connected - rounded up side/flat side down.


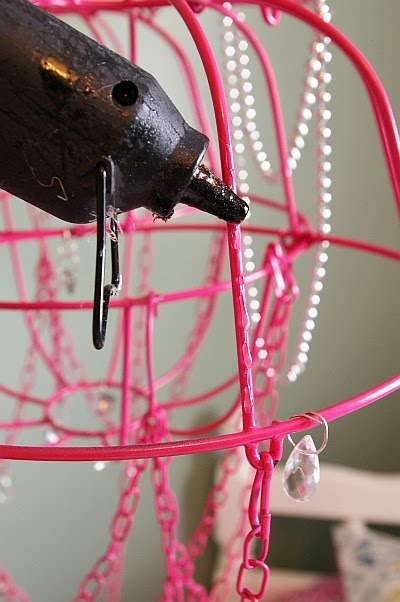
Connect the 4 points that touch (2 on each side. See photo below) with wire. To wrap these with wire easily, apply a small dot of hot glue and then wind the wire around.


Step 4: Turn the entire piece over.....


and place the 4th basket in the middle -flat side down (see photo below). Attached it with wire at the 4 points that are touching as before.


(a close up of how I connected the pieces together with wire)


Flip it back over. Using the top basket that you threaded the hook and chain through the center, the entire connected "chandelier" should now look like this:


Step 5: PAINT! (optional) Hang, spray paint and let dry. We used "berry pink" ultra cover by Rustoleum.


and came out with this beauty! (squeal! White would have been pretty too! just think of all the fun colors you could do!)


Step 6: Give your chandelier a bit of "shape" (this step is easiest to do if it is hanging). Take the 2 outside hooks and place on the inner rings on each side (see photos below). Secure the hook in place with a small dot of hot glue.

Now the chains that hang have some curves, shape and loop to them.

Step 7: EMBELLISH! now the fun really begins! If you have a supplies stash, you may have some gems you can use. If not, this step can be the "spendy" part. Be sure to look for sales or use coupons at your local craft stores if you can when shopping for crystal embellishments. Don't forget - we picked up a pack of silver "mardi gras" style necklaces at the $1 store. 6 came in a pack too!


 There are soooo many hoops, ledges, chains and other surfaces to attach beads and jewels to on your new chandelier - so have fun! Here are a few ideas of places we attached our embellishments....

Detach the center bottom hanging hook and replaced it with a large crystal and jump ring.


I hung teardrop style crystals from the bottoms of each of the loops on the outside chains (pictured above) and also hung smaller round crystals on the chains above the teardrop crystals.
Dress up the center and outside rings....

Draped beaded necklaces on the center front and back. Just a dot of hot glue on each side....


  I also glued some beading to the frame on the sides and draped it into the middle....repeated on the opposite side......


Just have fun where and how your embellish, drape and dress up your chandelier!


I want to see how YOU crafted up this project! Share your own style - whether it be classic, boho chic, shabby, holiday themed, cottage, etc - post a photo in the Brassy Apple Flickr Group!


Visit thecsiproject.com


I will be linking up here.....


Our project was awared "Jen's PICK"  in the CSI paint challenge! thanks Jen!


New Nostalgia


This project did double duty! It was entered into the Dollar Store Craft challenge and made the top 10!

Visit thecsiproject.com
Read More